INTRODUCTION
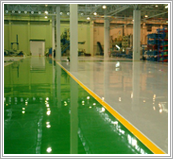
Rockmax Supercote HPSL is a four components high performance self leveling epoxy resin floor. The material packs consist of base, hardener, aggregate and color pack. The cured product achieve high chemical and abrasion resistance include with smooth, seamless, hygienic floor. It can be laid between 2.00mm and 3.00mm thickness.
AREA OF USES
ADVANTAGES
APPLICATION AND INSTALLATION
PREPARATION
New concrete substrate
Concrete must be sound, clean and free from oil, grease, wax, cement paste, dust, dirt and any other contaminants. Concrete must be at least 28 days and minimum Compressive strength 25N/mm2 and minimum tensile strength (pull off) at 1.5 N/mm2. Moisture content in concrete must less than 4%. All floors shall received the material topping should be protected by damp proof membrane and not suffer from rising damp. The substrate should not have a relative humidity more than 75% at installation period. Total enclosed impact shot blasting, high water pressure jet, grit planner or scarifying must be employed followed by vacuuming.
Old concrete (Uncoated concrete)
Old concrete or uncoated concrete floors is done in much similar manner to new concrete preparation. The concrete surface must be thoroughly cleaned with a strong detergent cleaner to remove all grease, oils and etc. Holes and cracks must be repaired use epoxy injection and epoxy mortar (please consult Rockmax for more information).
Previously coated concrete surface
Existing coated surface must be completely removed by sand blasting until received sound surface. Clean all surface with detergent cleaner. Total enclosed impact shot blasting, high water pressure jet, grit planner or scarifying must be employed followed by vacuuming.
PRIMING
Apply Rockmax Supercote P at 1 coat. However on the porous concrete substrate 2 coat of primer must be applied. Allow the primer to dry prior to application (approximate 6-8 hours at 30ºC). Please refer Rockmax Supercote P datasheet for more information.
MIXING
Stir base and hardener component separately approximate 10 second. Mix pigment (part D) with base (part A) for 15 second. Add hardener (part B) and continue mix for further 30 second. Add aggregate (part C) and mix for approximate 3 minutes until completely homogeneous using electric mixer (400-500 rpm). Avoid whipping air into the material. It is recommended that only full units be used, that all components are thoroughly mixed. We do not recommend using partial kits and reduce material.
APPLICATION
This material must be applied by specialist trained applicator. Expansion joints, movement joints, thermal control joints must be followed. The guide line joints detail available upon request.
Pour mixed material directly on the surface in a long puddle and spread using either trowel or rubber squeegee. Pull through material until end of joints. Pour new material on to end of joints to maintain wet edge. Check film thickness frequently. Use spike roller to remove any entrapped air. Do not spike roller after 30 minutes or the initial setting time of material. Ambient temperature might be effect to pot life and curing time.
CURING
Protect applied areas from foot traffic at approximate 24 hours and fully cure in 7 days.
CLEANING
Clean all tools and equipments immediately with acetone, xylene or other solvents.
PACKAGING
23kg set.


